
Most home theaters have the screen and sound system dialed in, 4K projector, surround speakers, maybe even a subwoofer that rattles the floor. But when someone hits play, dialogue gets muddy, bass booms unevenly, and every hard surface in the room bounces sound around like a racquetball court. That’s where acoustic treatment steps in. Sound panels aren’t about making things louder: they control reflections, tame echoes, and let the equipment do what it’s designed to do. Whether someone’s building a dedicated theater room or upgrading a living room setup, the right panels make a noticeable difference without tearing into walls or blowing the budget.
Table of Contents
ToggleKey Takeaways
- Sound panels for home theater control reflections and echoes rather than amplify volume, improving dialogue clarity and overall audio quality without major construction.
- Fabric-wrapped acoustic panels with fiberglass cores offer better performance and aesthetics than foam alternatives, absorbing a broader frequency range especially in lower mids.
- Cover 15–25% of wall surface area with sound panels for optimal treatment, with thicker panels (2–4 inches) reaching lower frequencies and controlling bass rumble more effectively.
- Position sound panels at early reflection points on side walls and ceilings, identified using the mirror technique, while also treating the back wall to tighten the surround field.
- DIY installation is straightforward for most homeowners with basic tools like a drill and stud finder, saving costs while allowing easy repositioning and experimentation before final placement.
- Pair wall-mounted panels with corner bass traps to manage the lowest frequency octaves, achieving balanced sound control across the entire spectrum.
Why Acoustic Treatment Matters for Your Home Theater
Sound doesn’t travel in a straight line from speaker to ear. It hits walls, ceilings, furniture, windows, anything solid, and bounces back. In an untreated room, those reflections arrive at different times, creating comb filtering, flutter echoes, and standing waves. The result? Dialogue that sounds hollow, bass that booms in one corner and disappears in another, and a soundstage that feels cramped instead of immersive.
Acoustic panels absorb mid- and high-frequency reflections, which cleans up vocal clarity and instrument separation. They won’t fix bass issues on their own, that requires bass traps, which are thicker and denser, but they handle the bulk of what makes a room sound “echoey” or harsh. Even a modest setup of four to eight panels can flatten out response enough that a receiver’s room correction software (like Audyssey or Dirac) has less work to do.
It’s also worth noting what panels don’t do: they don’t soundproof. Soundproofing stops sound from traveling between rooms and requires mass, decoupling, and sometimes construction work. Acoustic treatment improves sound quality inside the room. If the goal is to keep neighbors or family from hearing the theater, that’s a different project, one that may involve resilient channels, mass-loaded vinyl, or even a floating floor. For most home theater setups, though, the issue isn’t isolation: it’s controlling reflections so the room doesn’t sabotage the speakers.
Types of Sound Panels to Consider
Acoustic Foam Panels
Foam panels are the budget-friendly entry point. They’re lightweight, easy to mount with adhesive strips or spray glue, and come in a variety of shapes, wedge, pyramid, eggcrate. Most are made from open-cell polyurethane foam and work best above 500 Hz, which covers vocals and high-mids but doesn’t do much for low-end rumble.
Thickness matters. A 1-inch foam panel is better than nothing, but 2-inch or thicker foam handles a wider frequency range. The trade-off is aesthetics: foam panels look like foam panels. They’re functional, but they won’t blend into a finished space the way fabric-wrapped panels do. They’re also more prone to dust accumulation and can yellow over time, especially in rooms with UV exposure.
For someone on a tight budget or treating a garage or basement space where looks aren’t a priority, foam works. But it’s not the only option, and it’s often not the best one for a dedicated theater room where design matters.
Fabric-Wrapped Acoustic Panels
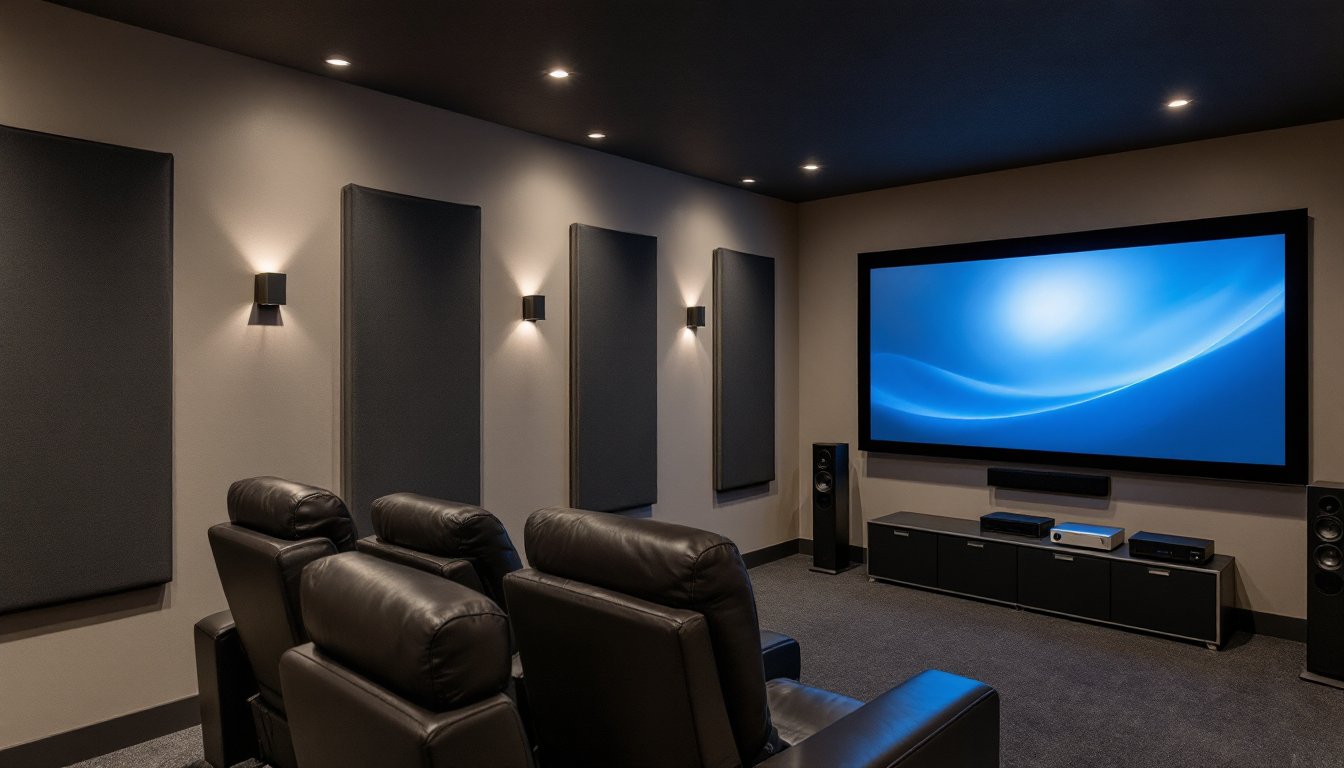
Fabric-wrapped panels are the step up in both performance and appearance. They typically consist of a rigid fiberglass or mineral wool core (often 2 to 4 inches thick) wrapped in acoustically transparent fabric. The core does the heavy lifting, fiberglass absorbs across a broader range than foam, especially in the lower mids, and the fabric can be matched to room decor.
These panels are heavier, which means they need proper mounting. Z-clips or French cleats are common hardware choices: adhesive alone won’t hold them long-term. Some manufacturers offer panels with beveled edges or custom prints, so they can double as wall art. That’s a win in shared spaces where a home theater setup has to coexist with living room furniture.
Pre-made panels from companies featured in product reviews for home appliances run anywhere from $30 to $100 each, depending on size and fabric. DIY builders can cut costs by buying Roxul Safe’n’Sound or Owens Corning 703 by the bale and wrapping it in fabric from a local upholstery shop. It’s a weekend project with a saw, staple gun, and wood frame, and the savings add up fast when treating a whole room.
How to Choose the Right Sound Panels for Your Space
Room size, speaker placement, and budget all factor into panel selection. A small room (10×12 feet or smaller) with hard floors and drywall will need more aggressive treatment than a carpeted space with upholstered furniture. The goal isn’t to deaden the room completely, that creates a lifeless sound, but to control the first and second reflections that cause the most audible problems.
Start by identifying reflection points. Sit in the main listening position and have someone hold a mirror flat against the side walls, moving it until the speakers are visible. Those spots are where early reflections hit, and they’re prime real estate for panels. The same technique works for the ceiling if the room has a low height (8 feet or less).
Panel thickness correlates with how low in frequency the panel absorbs. A 2-inch panel might start working around 500 Hz: a 4-inch panel can reach down to 250 Hz or lower. For home theater use, where movie soundtracks have serious low-mid energy, thicker is better. If budget allows, mix in some corner bass traps (triangular panels that fit in ceiling-wall junctions or floor corners) to handle the lowest octaves.
Don’t ignore the back wall. In many setups, the rear surround speakers fire toward the seating area, and untreated drywall behind the couch sends reflections right back. A pair of panels on the back wall, centered behind the listening position, can tighten up the surround field noticeably.
Finally, if the room doubles as a living space, consider panels that can be mounted as needed or moved. Some builders attach panels to lightweight frames and hang them on picture hooks. It’s not a permanent installation, but it’s enough to make a difference during movie night without committing to a full theater aesthetic.
Installation Tips and Placement Strategies
Mounting panels isn’t complicated, but doing it right keeps them secure and looking clean. For foam panels, adhesive spray like 3M Super 77 or double-sided mounting squares work fine on painted drywall. Press firmly and let the adhesive cure for 24 hours before handling. Be aware that some adhesives can pull paint or leave residue when removed.
Fabric-wrapped panels need more robust mounting. Z-clips are the go-to: screw one half into a stud or use drywall anchors rated for the panel’s weight (usually 5–15 pounds), then hang the panel on the matching clip. This method allows for easy removal and repositioning. French cleats work similarly and distribute weight well, but they require a table saw to rip the angled cut.
Avoid mounting panels directly against drywall with no air gap if possible. A 1- to 2-inch air gap behind the panel extends low-frequency absorption because the air acts as an additional absorptive layer. Some Z-clip systems create this gap automatically: otherwise, use furring strips or standoffs.
For ceiling panels, toggle bolts or screw-in anchors rated for ceiling use are essential. Gravity’s working against the mounting hardware here. If someone’s uncomfortable drilling into a ceiling, cloud panels (large, horizontal panels suspended by cables or chain) offer flexibility and can be positioned to target ceiling reflections without permanent hardware.
Safety note: Fiberglass and mineral wool panels should be handled with gloves and a dust mask during installation. The fibers can irritate skin and lungs. Once wrapped and mounted, they’re inert, but during cutting and handling, PPE is non-negotiable.
Placement density varies, but a general rule is to cover 15–25% of wall surface area in a typical home theater. More than that risks overdamping: less leaves too many reflections untreated. Start conservative, listen for a week, then add more if needed. It’s easier to add panels than to remove them and patch walls.
DIY vs. Professional Installation: What’s Best for You?
Installing sound panels is well within reach for most DIYers. It requires basic tools, drill, level, stud finder, measuring tape, and the skills involved are straightforward. If someone’s hung shelves or picture frames, they can handle panels. The time investment for an average-sized room (treating 8–12 panels) is a few hours, including layout and mounting.
DIY also allows for experimentation. Guides on advanced construction techniques explain how to build custom frames or integrate panels into ceiling coffers for a cleaner look. Moving panels around to fine-tune placement is easier when the installer knows exactly how they’re mounted and can adjust without calling someone back.
That said, professional installation makes sense in a few scenarios. If the room has high ceilings (10 feet or more), working overhead on a ladder with heavy panels gets awkward fast. A second pair of hands, or a pro with scaffolding, speeds things up and reduces the risk of a dropped panel or a stud finder that can’t locate framing through thick plaster.
Professionals also bring acoustic measurement tools. Some integrators use software and calibrated microphones to map room response before and after treatment, ensuring panels go where they’ll do the most good. For someone building a high-end dedicated theater and who wants measurable results, that expertise is worth paying for. Expect to spend $500–$1,500 for professional acoustic consultation and installation, depending on room size and panel count.
For most home theater projects, though, DIY installation is the practical choice. The learning curve is low, the tools are common, and the results are immediately audible. Many resources on smart home device reviews also touch on home theater optimization, offering layout tips that complement panel placement. The key is to measure twice, mount once, and not overthink it, acoustic treatment is forgiving, and even imperfect placement beats no treatment at all.