
Building a wine cellar at home isn’t just about storage, it’s about creating controlled conditions that let your bottles age gracefully while staying accessible. Whether you’re converting a closet or finishing out a basement corner, a functional wine cellar protects your investment and elevates your space. This guide walks through location selection, climate control, racking systems, and the real costs involved. You’ll learn which projects work for confident DIYers and when to call in pros.
Table of Contents
ToggleKey Takeaways
- A home wine cellar maintains consistent temperature (55–58°F) and humidity (60–70%) to prevent cork dry-out, oxidation, and premature aging while adding resale value to your property.
- Basement spaces are the ideal location for a wine cellar due to naturally stable temperatures and minimal thermal load, though under-stair closets and upper-floor conversions work with proper insulation (R-19 minimum) and dedicated cooling systems.
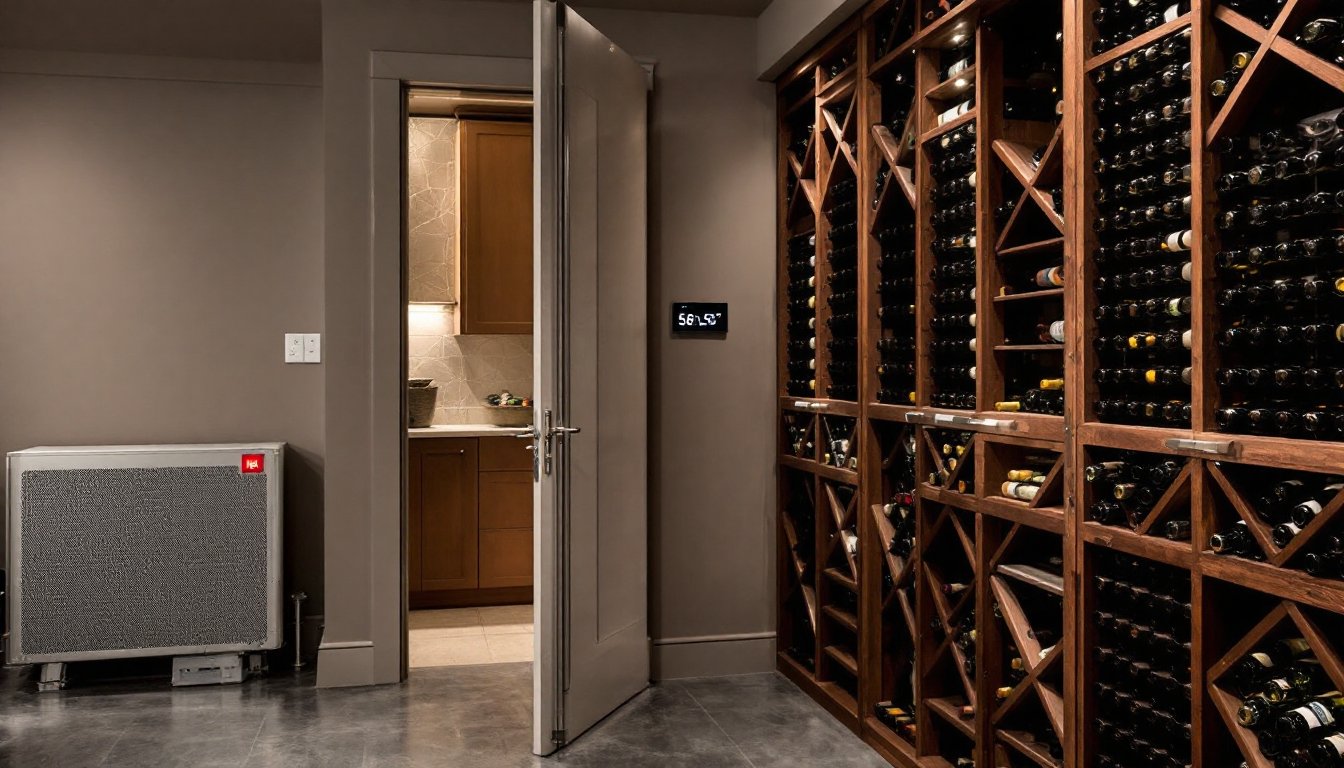
- Climate control is critical: choose between through-wall units ($1,500–$4,000), ductless split systems ($3,000–$6,000), or self-contained refrigeration based on your cellar’s cubic footage and available space for exhaust venting.
- DIY-friendly wine cellar tasks include framing, insulation installation, drywall work, and modular racking assembly, but HVAC work, electrical circuits, and custom millwork should be handled by licensed professionals to ensure code compliance and safety.
- A complete wine cellar project ranges from $2,500–$5,000 for a modest DIY closet conversion to $10,000–$50,000+ for professional turnkey installations, with monthly and quarterly maintenance checks essential to preserve wine quality and equipment performance.
Why Every Wine Lover Should Consider a Home Wine Cellar
A proper wine cellar maintains consistent temperature and humidity, preventing cork dry-out, oxidation, and premature aging. Unlike a kitchen wine rack or garage shelf, a dedicated cellar eliminates light exposure and vibration, two factors that degrade wine quality over time.
Homeowners who collect even a modest 50–100 bottles benefit from centralized, climate-controlled storage. Bottles purchased young can develop complexity over years instead of turning to vinegar in fluctuating conditions. Plus, a well-designed cellar adds resale value: buyers appreciate finished, functional spaces that showcase attention to detail.
Beyond preservation, a home cellar offers convenience. No more last-minute runs to the store or wondering if that special vintage survived the summer heat. With the rise of home design platforms featuring custom wine storage, more homeowners are realizing that a cellar doesn’t require a mansion, just smart planning and the right footprint.
Choosing the Right Location for Your Wine Cellar
Location drives everything: construction complexity, climate control costs, and long-term performance. Ideal spots stay naturally cool and dark, with minimal temperature swing.
Basement spaces are the gold standard. Below-grade rooms maintain stable temperatures year-round, require less insulation, and offer natural darkness. Look for interior corners away from furnaces, water heaters, or exterior foundation walls prone to moisture infiltration.
Under-stair closets work well for smaller collections (100–200 bottles). They’re typically interior spaces with no exterior walls, reducing thermal load. You’ll need to retrofit insulation, vapor barriers, and a compact cooling unit, but the footprint is efficient.
Converted spare rooms or walk-in closets on upper floors are doable but demand robust climate control and insulation. Exterior walls must be insulated to R-19 minimum (fiberglass batts or closed-cell spray foam). Floors and ceilings benefit from R-13 to prevent heat transfer from adjacent rooms.
Avoid garages, attics, or spaces near HVAC equipment. Temperature extremes and vibration will sabotage even the best racking system. If the only available space is above-grade, budget for a through-wall cooling unit (1,000–3,000 BTU, depending on cubic footage) and plan for thicker insulation.
Check local building codes before framing or running electrical. Some jurisdictions require permits for rooms exceeding certain square footage or for adding dedicated HVAC equipment. When in doubt, consult your municipality’s building department.
Essential Design Elements and Climate Control Systems
A functional wine cellar balances insulation, vapor control, lighting, and climate equipment. Cutting corners on any of these invites mold, temperature drift, or energy waste.
Insulation and vapor barriers are non-negotiable. Frame walls with 2×4 or 2×6 studs and fill cavities with closed-cell spray foam or fiberglass batts rated R-19. Install a 6-mil polyethylene vapor barrier on the warm side (exterior) of insulation to prevent condensation inside wall cavities. Seal seams with contractor tape.
Doors should be exterior-grade or solid-core with weatherstripping. A threshold sweep blocks air infiltration at the floor. Glass doors look sharp but require dual-pane, low-E glass to prevent heat gain: even then, they’re less thermally efficient than solid wood or insulated steel.
Lighting must be low-heat. LED strip lights or recessed LED cans (3000K color temperature) provide visibility without UV exposure or heat buildup. Avoid incandescent or halogen fixtures, they radiate heat and degrade wine over time. Install dimmer switches to minimize light exposure when selecting bottles.
Temperature and Humidity Requirements
Wine cellars demand tight environmental control: 55–58°F and 60–70% relative humidity. Temperatures above 65°F accelerate aging: below 50°F slows it to a crawl and can harden corks. Humidity below 50% dries out corks, allowing oxygen infiltration. Above 80% invites mold on labels and wood racking.
Cooling units come in three types:
- Through-wall units (e.g., CellarPro, WhisperKOOL) mount like a window AC, venting heat into an adjacent space. They handle 200–2,000 cubic feet and cost $1,500–$4,000. Best for basements or interior closets with an adjoining room or crawlspace for exhaust.
- Ductless split systems separate the evaporator (inside the cellar) from the condenser (outside or in a mechanical room). Quieter and more efficient, they run $3,000–$6,000 installed. Ideal for upper-floor cellars or homes without adjacent exhaust space.
- Self-contained refrigeration units fit entirely within the cellar and recirculate air. Compact but noisier: suitable for closets under 100 cubic feet.
Pair the cooling unit with a digital hygrometer/thermometer to monitor conditions. Units with built-in humidifiers or dehumidifiers simplify maintenance, manual pans of water or standalone dehumidifiers add labor.
Insulation tip: Size your cooling unit to the room’s cubic footage after accounting for heat load from lighting, exterior walls, and door infiltration. Undersized units run constantly: oversized units short-cycle and fail to control humidity.
Storage Solutions: Racking Systems and Shelving Options
Racking defines capacity, accessibility, and aesthetics. Choose based on bottle count, room dimensions, and whether you prioritize display or density.
Wood racking, typically redwood, mahogany, or pine, is the classic choice. Redwood and mahogany resist mold and won’t warp in high humidity. Pine is budget-friendly but requires sealing with a water-based polyurethane (avoid oil-based finishes that off-gas VOCs). Individual bottle slots work for collections you’ll rotate frequently: diamond bins stack cases or mixed bottles but make retrieval harder.
Metal racking (powder-coated steel or wrought iron) suits modern aesthetics and costs less than hardwood. It won’t absorb humidity or harbor mold, but cheap finishes can chip or rust. Look for racks with rubberized cradles to prevent label abrasion and vibration.
Modular kits (available from specialty retailers) arrive precut with dowels and hardware. They’re DIY-friendly, assembly takes a few hours with a drill and level, and scale easily as collections grow. Expect 10–12 bottles per linear foot of wall space with standard 3.75″ depth slots.
Custom built-ins maximize awkward spaces (under stairs, angled ceilings) and integrate display rows, case storage, and tasting counters. A finish carpenter or cabinetmaker charges $100–$200 per linear foot, but the result fits like furniture.
Depth matters: Standard wine racks are 13–16 inches deep to accommodate Bordeaux and Burgundy bottles. Champagne and magnums need 18–20 inches. Measure your collection’s bottle styles before ordering.
Always anchor racking to wall studs with 3-inch wood screws or toggle bolts rated for the load. A full rack holding 200 bottles weighs 300+ pounds. Freestanding units work for small collections but must be braced to prevent tipping.
Safety note: Wear gloves when handling raw lumber (splinters) and safety glasses when cutting or drilling. If using a miter saw for angled cuts on trim or custom racks, secure stock with clamps, never freehand.
Budget-Friendly DIY Wine Cellar Projects vs. Professional Installation
A closet conversion for 100–150 bottles can run $2,500–$5,000 DIY: insulation, vapor barrier, solid-core door, LED lighting, modular racking, and a through-wall cooling unit. That assumes you’re comfortable framing, running basic electrical (or hiring an electrician for a dedicated 20-amp circuit), and installing the cooling unit yourself.
DIY-friendly tasks:
- Framing walls with 2×4 studs on 16″ centers
- Installing fiberglass batt insulation and vapor barriers
- Hanging drywall and applying mold-resistant primer
- Assembling modular wood or metal racking
- Mounting LED strip lights or recessed cans
When to hire a pro:
- HVAC work: Through-wall and split-system cooling units often require refrigerant lines, condensate drains, and electrical hookups that exceed DIY scope. Licensed HVAC techs ensure units are sized correctly and installed to manufacturer specs. Cost: $500–$1,500 labor.
- Electrical: Adding a dedicated circuit for cooling units and lighting requires a permit in most jurisdictions. Hire a licensed electrician if you’re not confident working in your panel. Cost: $200–$400.
- Structural modifications: Removing walls, adding beams, or altering load-bearing framing needs engineering approval and a licensed contractor. Skipping permits can void homeowners insurance and tank resale value.
- Custom millwork: Built-in racking, counters, or tasting bars demand cabinetry skills and specialized tools (table saw, router, biscuit joiner). A finish carpenter delivers cleaner results if you lack experience.
Full turnkey installations, design, climate control, custom racking, lighting, and finishes, range from $10,000 to $50,000+ depending on square footage and material choices. High-end cellars with glass walls, refrigerated display cases, and stone flooring push costs higher.
Money-saving tips:
- Reuse existing closet framing and drywall if it’s in good shape: add insulation from the inside.
- Source modular racking kits online during off-season sales (January–March).
- Install a through-wall unit yourself if the manual is clear and you’re handy with a hole saw and caulk gun. Most manufacturers offer phone support.
- Skip decorative stone or tile floors: sealed concrete or luxury vinyl plank (LVP) performs just as well at a fraction of the cost.
Maintaining Your Wine Cellar for Optimal Performance
A well-built cellar needs minimal upkeep, but neglecting the basics invites costly repairs and spoiled bottles.
Monthly checks:
- Verify temperature and humidity with a digital hygrometer. Log readings to spot drift early.
- Inspect door weatherstripping and threshold sweeps for gaps or wear. Replace if light or air leaks through.
- Clean cooling unit filters (if applicable). Clogged filters reduce efficiency and shorten compressor life.
Quarterly tasks:
- Wipe down racking with a damp cloth to remove dust. Avoid harsh cleaners, water or diluted white vinegar works fine.
- Check for mold on walls, ceilings, or labels. If humidity creeps above 75%, run a small dehumidifier or improve ventilation.
- Test cooling unit operation. Listen for unusual noises (grinding, hissing) that signal refrigerant leaks or failing fans.
Annual maintenance:
- Vacuum condenser coils on through-wall or split-system units. Dust buildup reduces heat exchange and spikes energy use.
- Inspect vapor barriers and insulation if you notice condensation inside the cellar. Water stains on drywall suggest barrier failure, address it before mold spreads.
- Rotate bottles if you store them for years. Wines with natural corks benefit from occasional repositioning to keep corks moist.
When to call for service: If the cooling unit runs constantly but temperatures rise, or if humidity swings wildly even though stable settings, the unit may be undersized or malfunctioning. HVAC pros can test refrigerant levels, replace sensors, or recommend a larger system.
Keep spare parts on hand, replacement filters, weatherstripping, and hygrometer batteries, so minor issues don’t snowball. A well-maintained cellar will outlast the bottles it protects, preserving both your collection and your home’s value for decades.